Self-sufficiency is a funny thing. At one time I imagine we all provided for ourselves; our belongings, food, clothing and shelter all a product of our own doing. Through time, however, we have become increasingly dependent on others to live. All of our food, for example, can now be sourced in one 4,000 square foot building. Fresh, dried, and frozen ingredients from all over the world to cater for our every want and desire, whenever we like.
For the most part, this is a wonderful thing – time we would have spent hunting and gathering can now be spent learning, traveling, starting families and forging careers. On the flip side, this disconnect from the natural order of things is, in my view, damaging our bodies and the environment we live in (PREACH!).
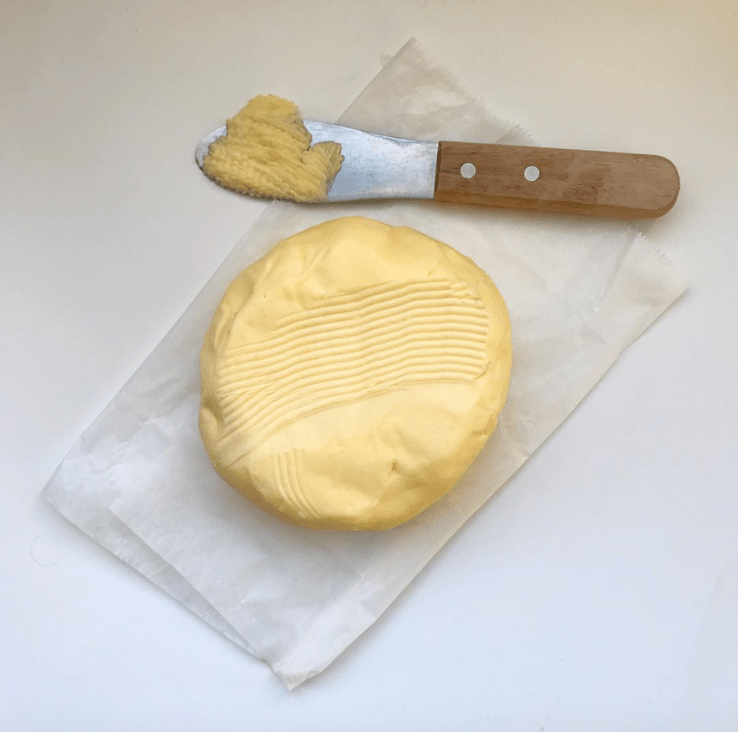
Homemade butter – definitely worth it(?).
In 2018 I want to get closer to the food I eat, and i’m going to show you how you can, too. I’m not going off grid or moving into the mountains – but I want to revisit processes, techniques and ingredients that, for whatever reason, have slipped from our day-to-day repertoire. NOTE: I’ll still be visiting shops and the farmer’s market – this isn’t about complete self-sufficiency, it’s about providing yourself with delicious, homemade food.
I’ll post new recipes and videos to give you simple, affordable ideas for a taste of that #homesteadlife. No artificial ingredients or unnecessary packaging, just gorgeous food you’ll want to make again and again.
So let’s hear it, what do you want to see? Want to know how to make your own bread and ditch the supermarket stuff? An easy recipe for homemade bacon? The simplest guide to making your own cheese? Comment below or message me on Instagram or Twitter.
When was the last time you tasted a gooseberry? The encounter may well have been short and sour – you could even be one of a growing number of people whose first experience of a gooseberry is their last. In the not-too-distant future, however, these encounters (pleasurable or not) could be few and far between.
Piers Pool’s fruit farm, High House, is one of the few places left in the country that you can pick your own (PYO) gooseberries. ‘Their status somehow has changed,’ he said, ‘from being a sort-of staple to something that is a little bit more select and sought-after’.
The Suffolk farm has been growing gooseberries on a small-scale for 15 years. Before that, when Piers’ father ran the farm, the gooseberry field was nearly five times larger, spread over two and a half acres. ‘When we used to open [the field] for pick your own there would be cars parked all the way up that road and the public would come in here and clear the lot in one weekend – it was just unbelievable.’
Piers now sells an 100th of that quantity over the entire six week gooseberry season, but what is driving this fall in popularity? ‘Gooseberries, like rhubarb, are not something you can just buy and put in your mouth like you can with strawberries or raspberries,’ Piers said. ‘I think our cooking habits and our eating habits have changed, and now I think people aren’t so keen on the things that you actually have to cook and do something with.’
A bowl of gooseberries.
There is, according to Piers, still a small and steady demand for them as a ‘seasonal rarity’, but their short shelf life and limited availability make it difficult for the majority of consumers to buy them. On paper at least, there is very little incentive for farmers to invest in this small, grape-like fruit – so why grow them at all?
‘The sort of fruit farm that we are, we like to grow a little bit of everything,’ explained Piers. High House can also boast a number of apple and pear varieties, cherries, raspberries, strawberries, blackberries and a rarer relative of the latter – loganberries.
‘They’re not particularly difficult [to grow],’ Piers admitted, ‘but you’ve got to pay attention to detail…the biggest difference in growing gooseberries over the last few years is that pigeons are a massive problem.
‘We’ve had to start netting the gooseberries to keep [the pigeons] off, otherwise we would lose the whole crop.’ This intervention is only driving the cost of production higher, something that is not ideal for growers and buyers alike. Will Piers continue to grow gooseberries? ‘As long as the demand, albeit on small scale, is there.’
This week I was lucky enough to spend a morning with the lovely Danny McCubbin from Jamie’s Food Tube, teaching him how to make sourdough bread. After studying this versatile and complex dough for the last few years, I knew it would be difficult to summarise it’s process in a short video.
I hope I have illustrated the fundamentals and most importantly shown how simple, fun and delicious basic sourdough can be. If you decide to bake the recipe, please tweet me your pictures!
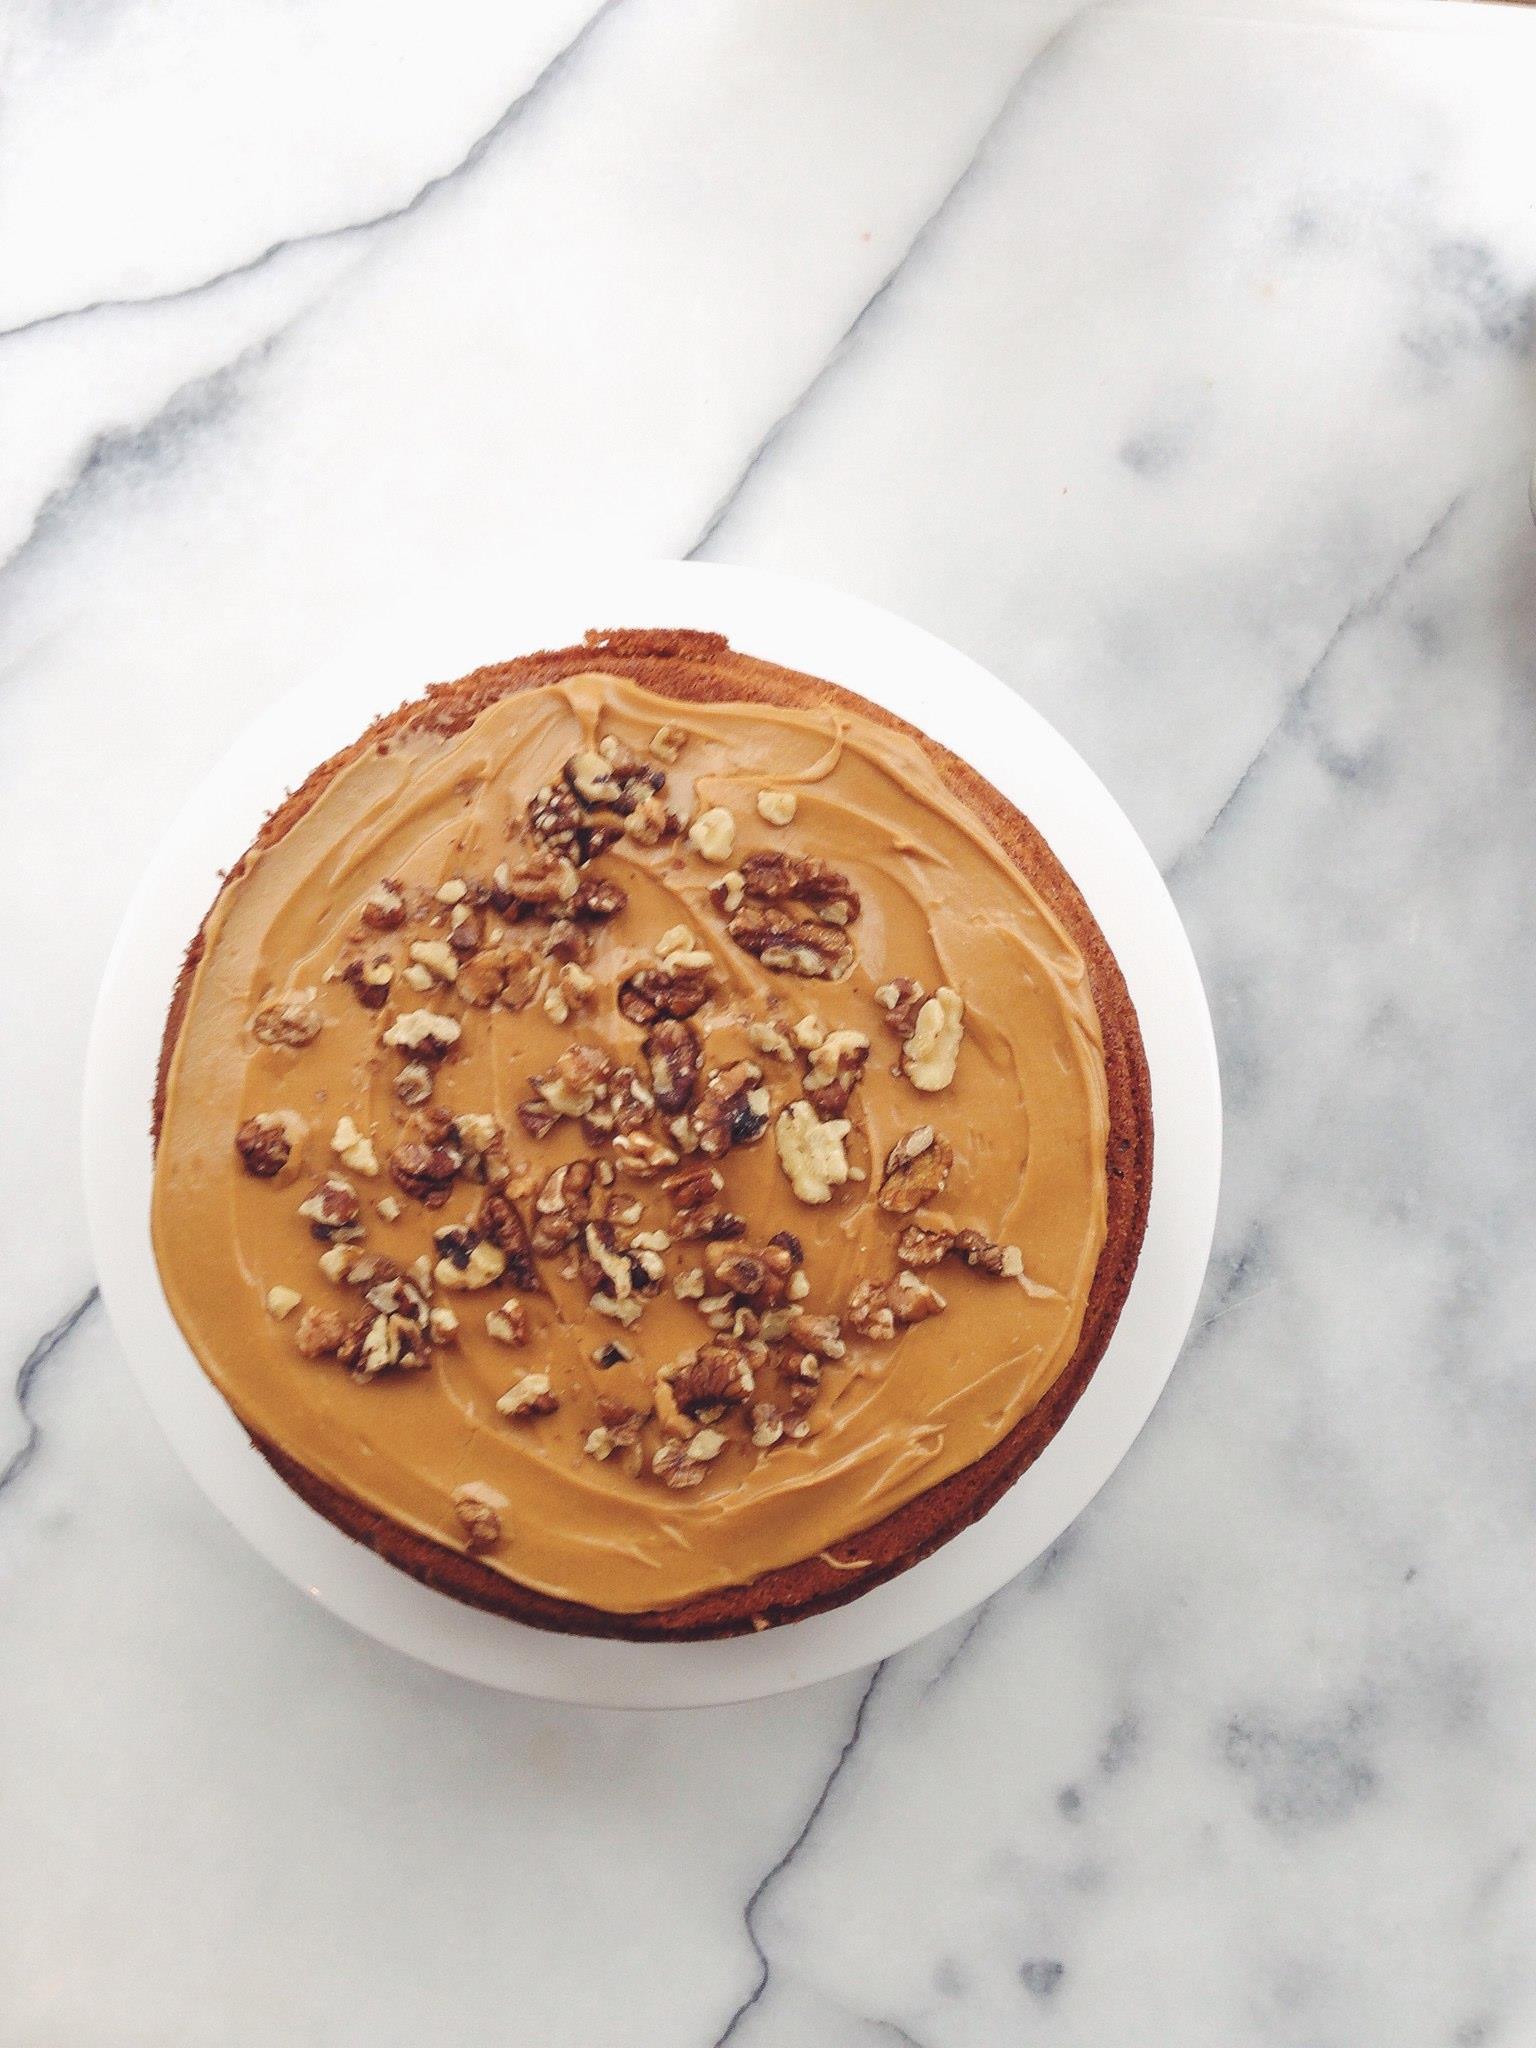
This heavenly coffee and walnut cake recipe is a delicious teatime treat. The method couldn’t be simpler and there is very little equipment required. If you haven’t baked a cake before, this is a great introductory recipe, but always remember two things: don’t open the oven door while the cake is baking, and be gentle when folding in the walnuts, so as to retain as much air as possible in the cake mixture.
Serves 8-10
500g self-raising flour
400g caster sugar
220g softened butter, plus extra for greasing
3 medium eggs
1 x double shot of espresso
120g walnuts, roughly chopped
1 tsp ground cloves
1 tsp ground nutmeg
2 tsp bicarbonate of soda
a pinch of salt
250g whole milk
For the buttercream
60g butter, softened
150g icing sugar
1 x single shot of espresso
Pre-heat your oven to 180c/160 fan/gas mark 4. Line and grease a medium-sized cake tin.
Sift the flour and bicarbonate of soda into the bowl of a large food processor. Add all of the other ingredients and blend until the mixture is thoroughly combined. Keep and eye on the cake mixture as it is blending and turn the food processor off as soon as it comes together.
Gently fold in 100g of the walnuts into the mixture and tip into the lined cake tin. Bake for 1 hour. Once baked, set aside on a cooling rack and allow to cool completely before removing the tin.
To make the buttercream, add the softened butter and sugar to a medium bowl and beat together using an electric whisk until light and fluffy. Add the espresso and mix again until combined.
Once the cake has cooled completely, remove from the tin and, with a palette knife or silicone spatula, evenly spread the buttercream on top. Scatter over the remaining walnuts.
On 18 February Busaba Eathai will celebrate their 15th birthday by opening their new flagship store in the heart of Shoreditch, London. The modern Thai eatery’s twelfth branch will open its doors on Bethnal Green Road for service at midday, boasting a ‘creative and regularly changing’ menu from Executive Chef Jude Sangsida.
New Busaba Shoreditch location. Source: Sauce Communications.
Busaba regulars needn’t fear, as classics including Thai calamari and sen chan pad thai will remain on the menu alongside newer dishes, like Thai roti wraps and chilli beef rice.
Dishes at Busaba. Source: Sauce Communications.
The new location, spread across two floors and accommodating up to 164 covers, represents the group’s evolution, said Busaba CEO Jason Myers. “This launch marks a pivotal moment in the Busaba Eathai story. Our new site here in Shoreditch brings together all of the magic of its predecessors as well as representing our evolution as we celebrate our 15th birthday.”
A unique feature to the Busaba Shoreditch branch will be the new Thai Kinnaree Bar (pron. Khin-NAH-rah). During the week the bar will host diners for lunch, with a number of new Thai-inspired cocktail offerings. On Friday and Saturday nights visitors can expect to hear music from the resident Hoxton Radio DJs.
Thai inspired cocktail at Busaba. Source: Sauce Communications.
As part of their fifteenth birthday, Busaba Eathai will be hosting 6-weeks of free Sookjai (‘happy heart’) events. Yoga sessions, meditation classes and wellbeing talks will all be included.
For more information, or to make a booking, visit: www.busaba.com.
This article was featured in TMRW Magazine. Read the online version here.
Some dishes don’t need a lot said about them, and this is one of them! It’s quick, simple, light and delicious. For me, the marmite is what brings all of the elements of the dish together, but it can easily be omitted. If you do remove the Marmite, add another 2 cloves of garlic and a little extra salt when seasoning.
Ingredients (serves 2):
4 cloves of garlic
10 thin slices of salami
1 tbsp Marmite
1 large knob of butter
A small handful of basil, roughly chopped
175g dried conchiglie
Method: Pre-heat your oven to 150c/130c fan/gas mark 2. Wrap the garlic in a layer of tin foil and gently roast for roughly 25 minutes, until very soft and the inside of the garlic clove has baked down to a paste.
After the garlic has been roasting for 15 minutes, spread the salami on a lined baking tray and add it to the oven with the garlic until crispy, about 10 minutes. When crisp, tear into quarters.
Bring a pan of water, with plenty of salt in, to the boil. Add the dried pasta to the water and cook as advised on the label.
When cooked, drain the pasta, reserving ½ cup of the cooking water. Put the pasta, cooking water and large knob of butter back into the pan and mix well over a low heat.
Add the marmite, garlic cloves (skins removed) and salami quarters to the pan and stir well until everything is heated through. Add a pinch of ground black pepper to taste and serve while hot. Shred the basil and scatter over the top to finish.
As a student, I know how easy it is to buy your soup from your closest Every Little Helps store. It takes no time at all, costs very little money and most importantly – there is next to no washing up.
For the same amount of time and washing up, you can create a soup that is marginally more expensive, but is unbelievably delicious. Not only that, but it freezes very well, so one large batch can sort your lunches for a week and cost as little as 60p per portion.
Luckily, I had a jar of chilli jam kicking around, but in this recipe, you can substitute the jam for one extra apple and a teaspoon of dried chilli flakes. Serve with a little crème fraiche to offset the heat.
Ingredients (serves 4):
1 large onion, peeled and roughly chopped
2 medium butternut squash, peeled and diced
2 cox apples, peeled and diced
1 litre vegetable stock
1 tbsp olive oil
1 tsp fennel seeds
1 tbsp chilli jam
1 tbsp garam masala
Method: Add the oil to a large, heavy based pan on a medium-high heat. When the oil is hot, add the squash, onion, apple and garam masala.
Stir so that everything has an even covering of oil and spice and cook for 4 minutes, or until the apple, onion and squash has gently coloured. Add the vegetable stock, fennel seeds and chilli jam and stir until incorporated well.
Bring the pan to the boil, and then simmer for 15 minutes, or until the squash is soft.
Take the pan off the heat and blend well with a stick blender, ensuring there are no large chunks of squash or apple. Season to taste. Serve while hot or freeze for up to 3 months.
Clementine curd doughnut at HH Bakery. Source: DWD.
As December approaches, we enter the height of clementine season. The smell of this amber fruit immediately sends me back to countless Christmas mornings, rummaging amongst chocolate coins and christmas parcels to the bottom of my stocking where I could find a clementine or two.
Here I use clementines to make a delicious curd, which is both sharp and sweet in equal measure. It is hugely versatile and can be used in place of any recipe that calls for lemon curd, for a festive alternative. I pipe the curd into doughnuts, until they are fit to burst (around 40g of curd per large doughnut).
Ingredients (makes 900g):
7 large clementines
2 lemons
350g caster sugar
4 eggs, beaten
3 egg yolks, beaten
100g unsalted butter, diced
Method: Set up an bain marie by heating a large pan of water to a gentle boil. Add a heat-proof bowl over the pan but ensure the water is not in contact with the bottom of the bowl.
Zest and juice all of the fruit and add it to bowl, along with the yolks, eggs and sugar and mix to combine.
Add the butter and stir constantly, so as not to scramble the eggs. Cook until the curd is thick, and coats the back of a spoon at least.
Either add to sterilised jars as a beautiful Christmas gift or keep, refrigerated, until needed. The curd will keep for up to two weeks.
My Instagram feed seems to be a magnet for comments from my Dad, which usually run along the lines of: “remember you’re a student,” but can escalate as far as “Celeriac gratin!? You’re a f**king student!”. Just recently, after plunging nearly all of my income into a new project (blog post to follow soon), I began to realise – I am a student.
If the meals I make were movies, as a director I am a Steven Spielberg/Quentin Tarantino hybrid. I don’t cook regularly, but when I do I tend to spend a lot of money (not just on ingredients but utensils I will probably never use again), I create mess, occasionally there is blood – but the soundtrack is good.
Student suppers are my low-budget, independent films starring actors you’ve either never heard of, or that you believed to be dead. They are films that are initially made out of necessity but do occasionally win an award, which is what is most important.
Over the coming months I will be posting low-budget meals that are not only quick but delicious. If you have any suggestions, questions, or would simply like advice on low-cost cooking, please get in touch.
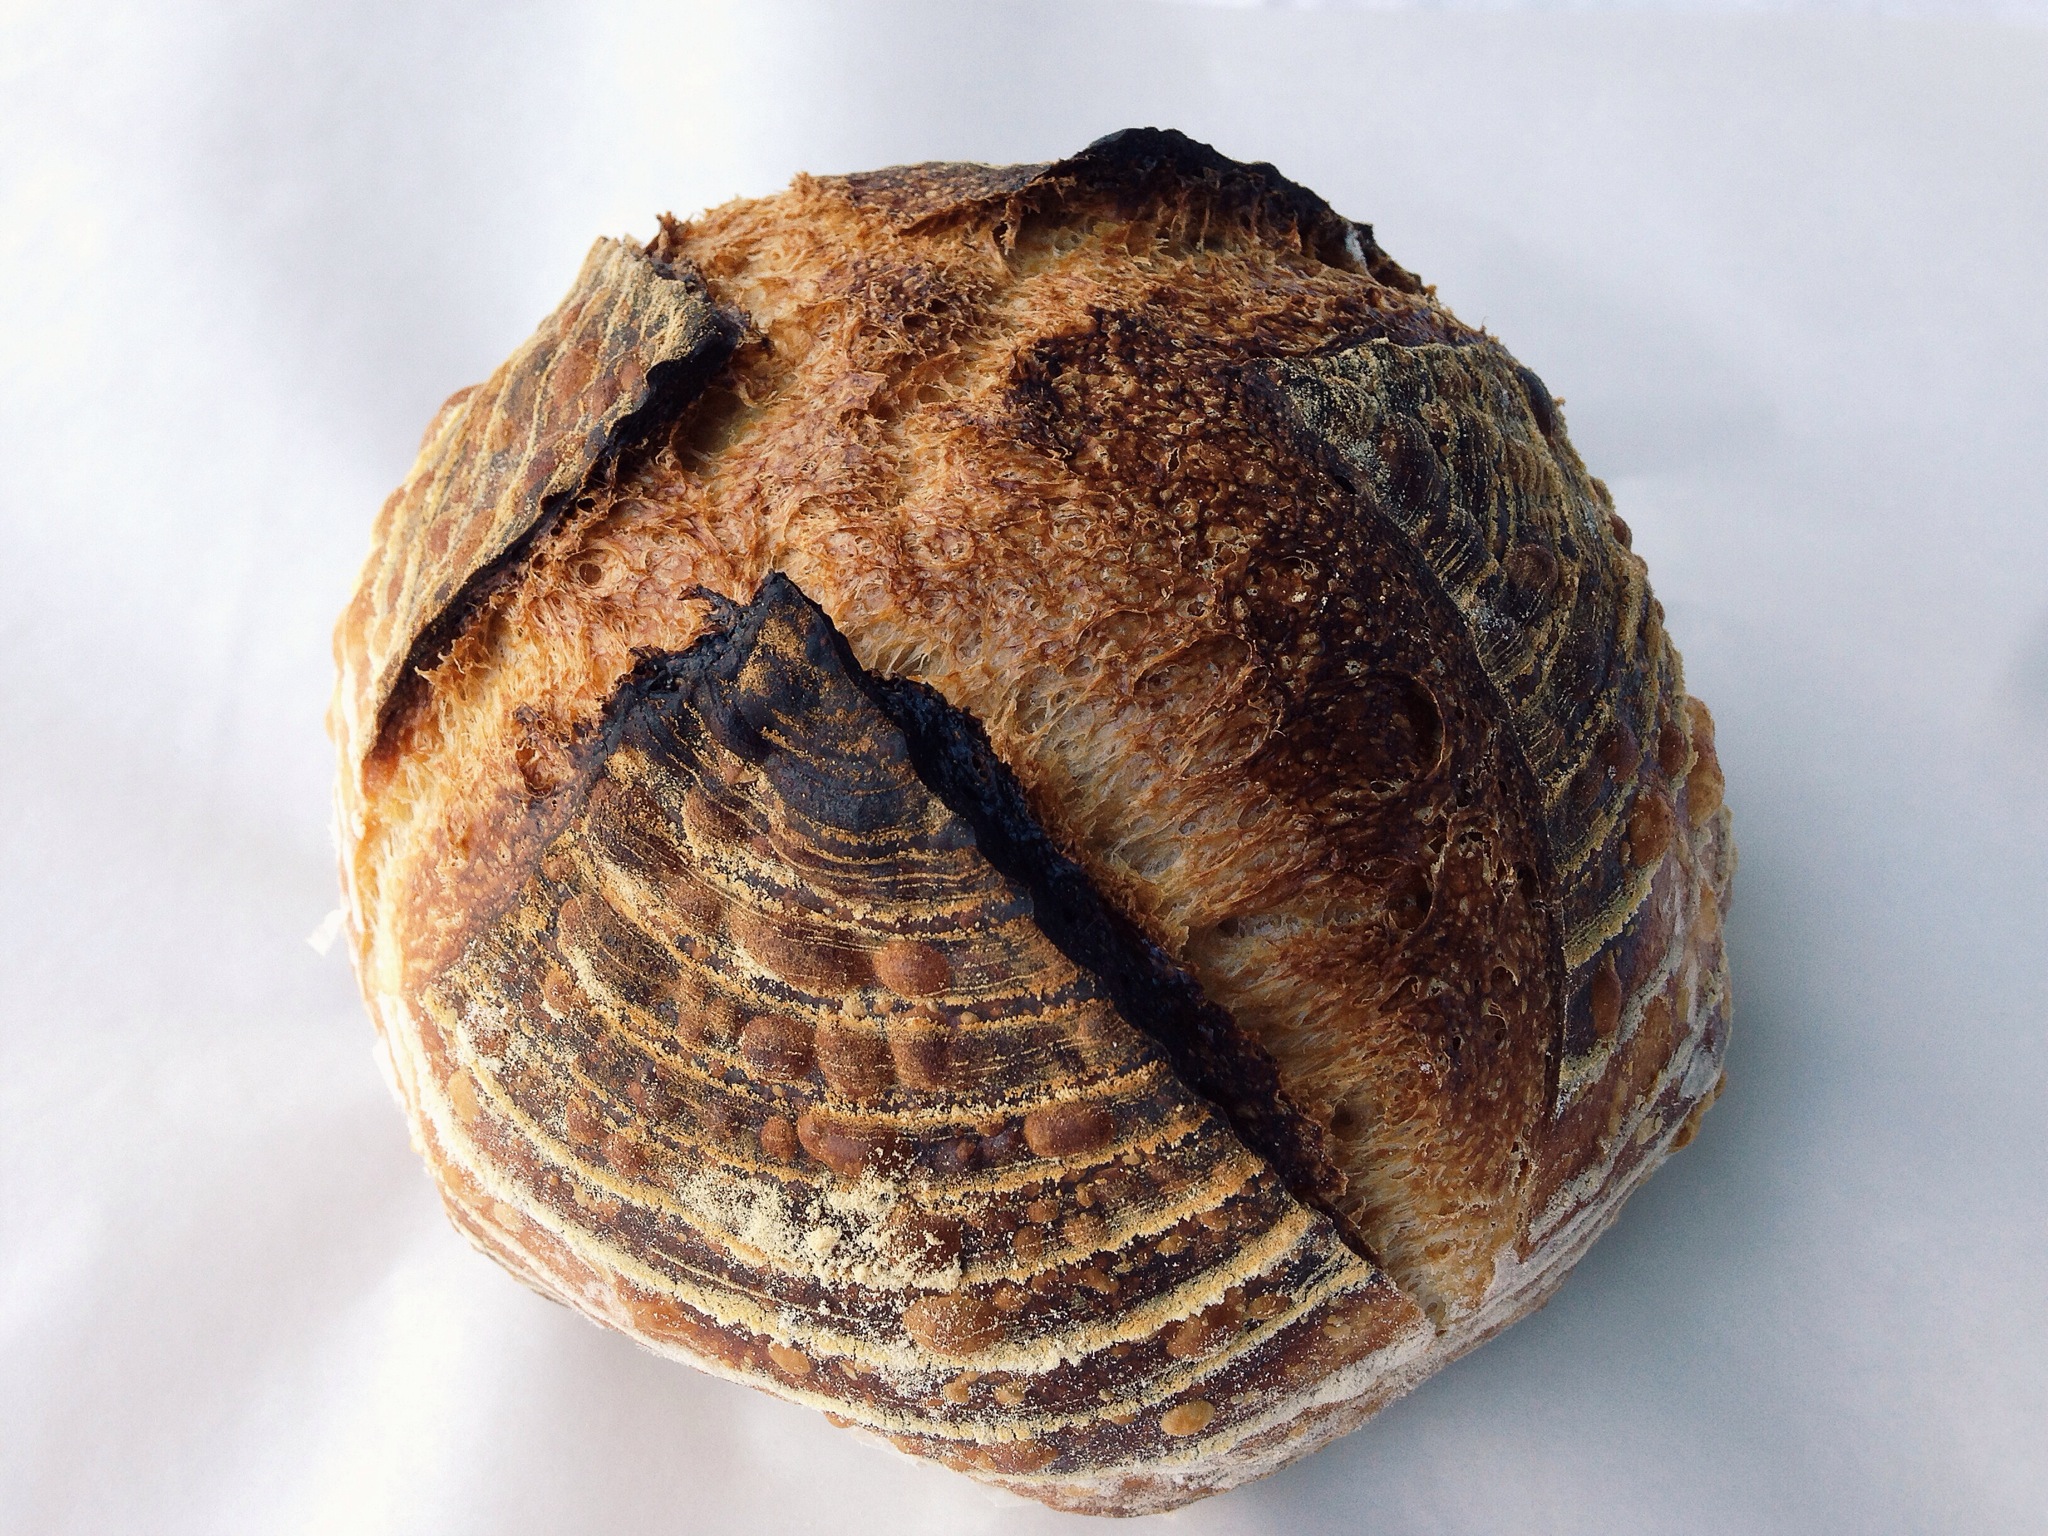
Naturally leavened bread, or sourdough, is one of the most satisfying things a baker can wish to pull from their oven. It does take time and a little patience, but the result will undoubtedly be some of the finest bread you have ever tasted.
Sourdough baked at home. Source: DWD.
Sourdough’s name refers to the slight tang in flavor caused by the production of acids during the retarded (cold) final proof, which can last from anything between 10 and 18 hours.
With a good method and an attention to detail, anyone can bake great tasting sourdough at home.
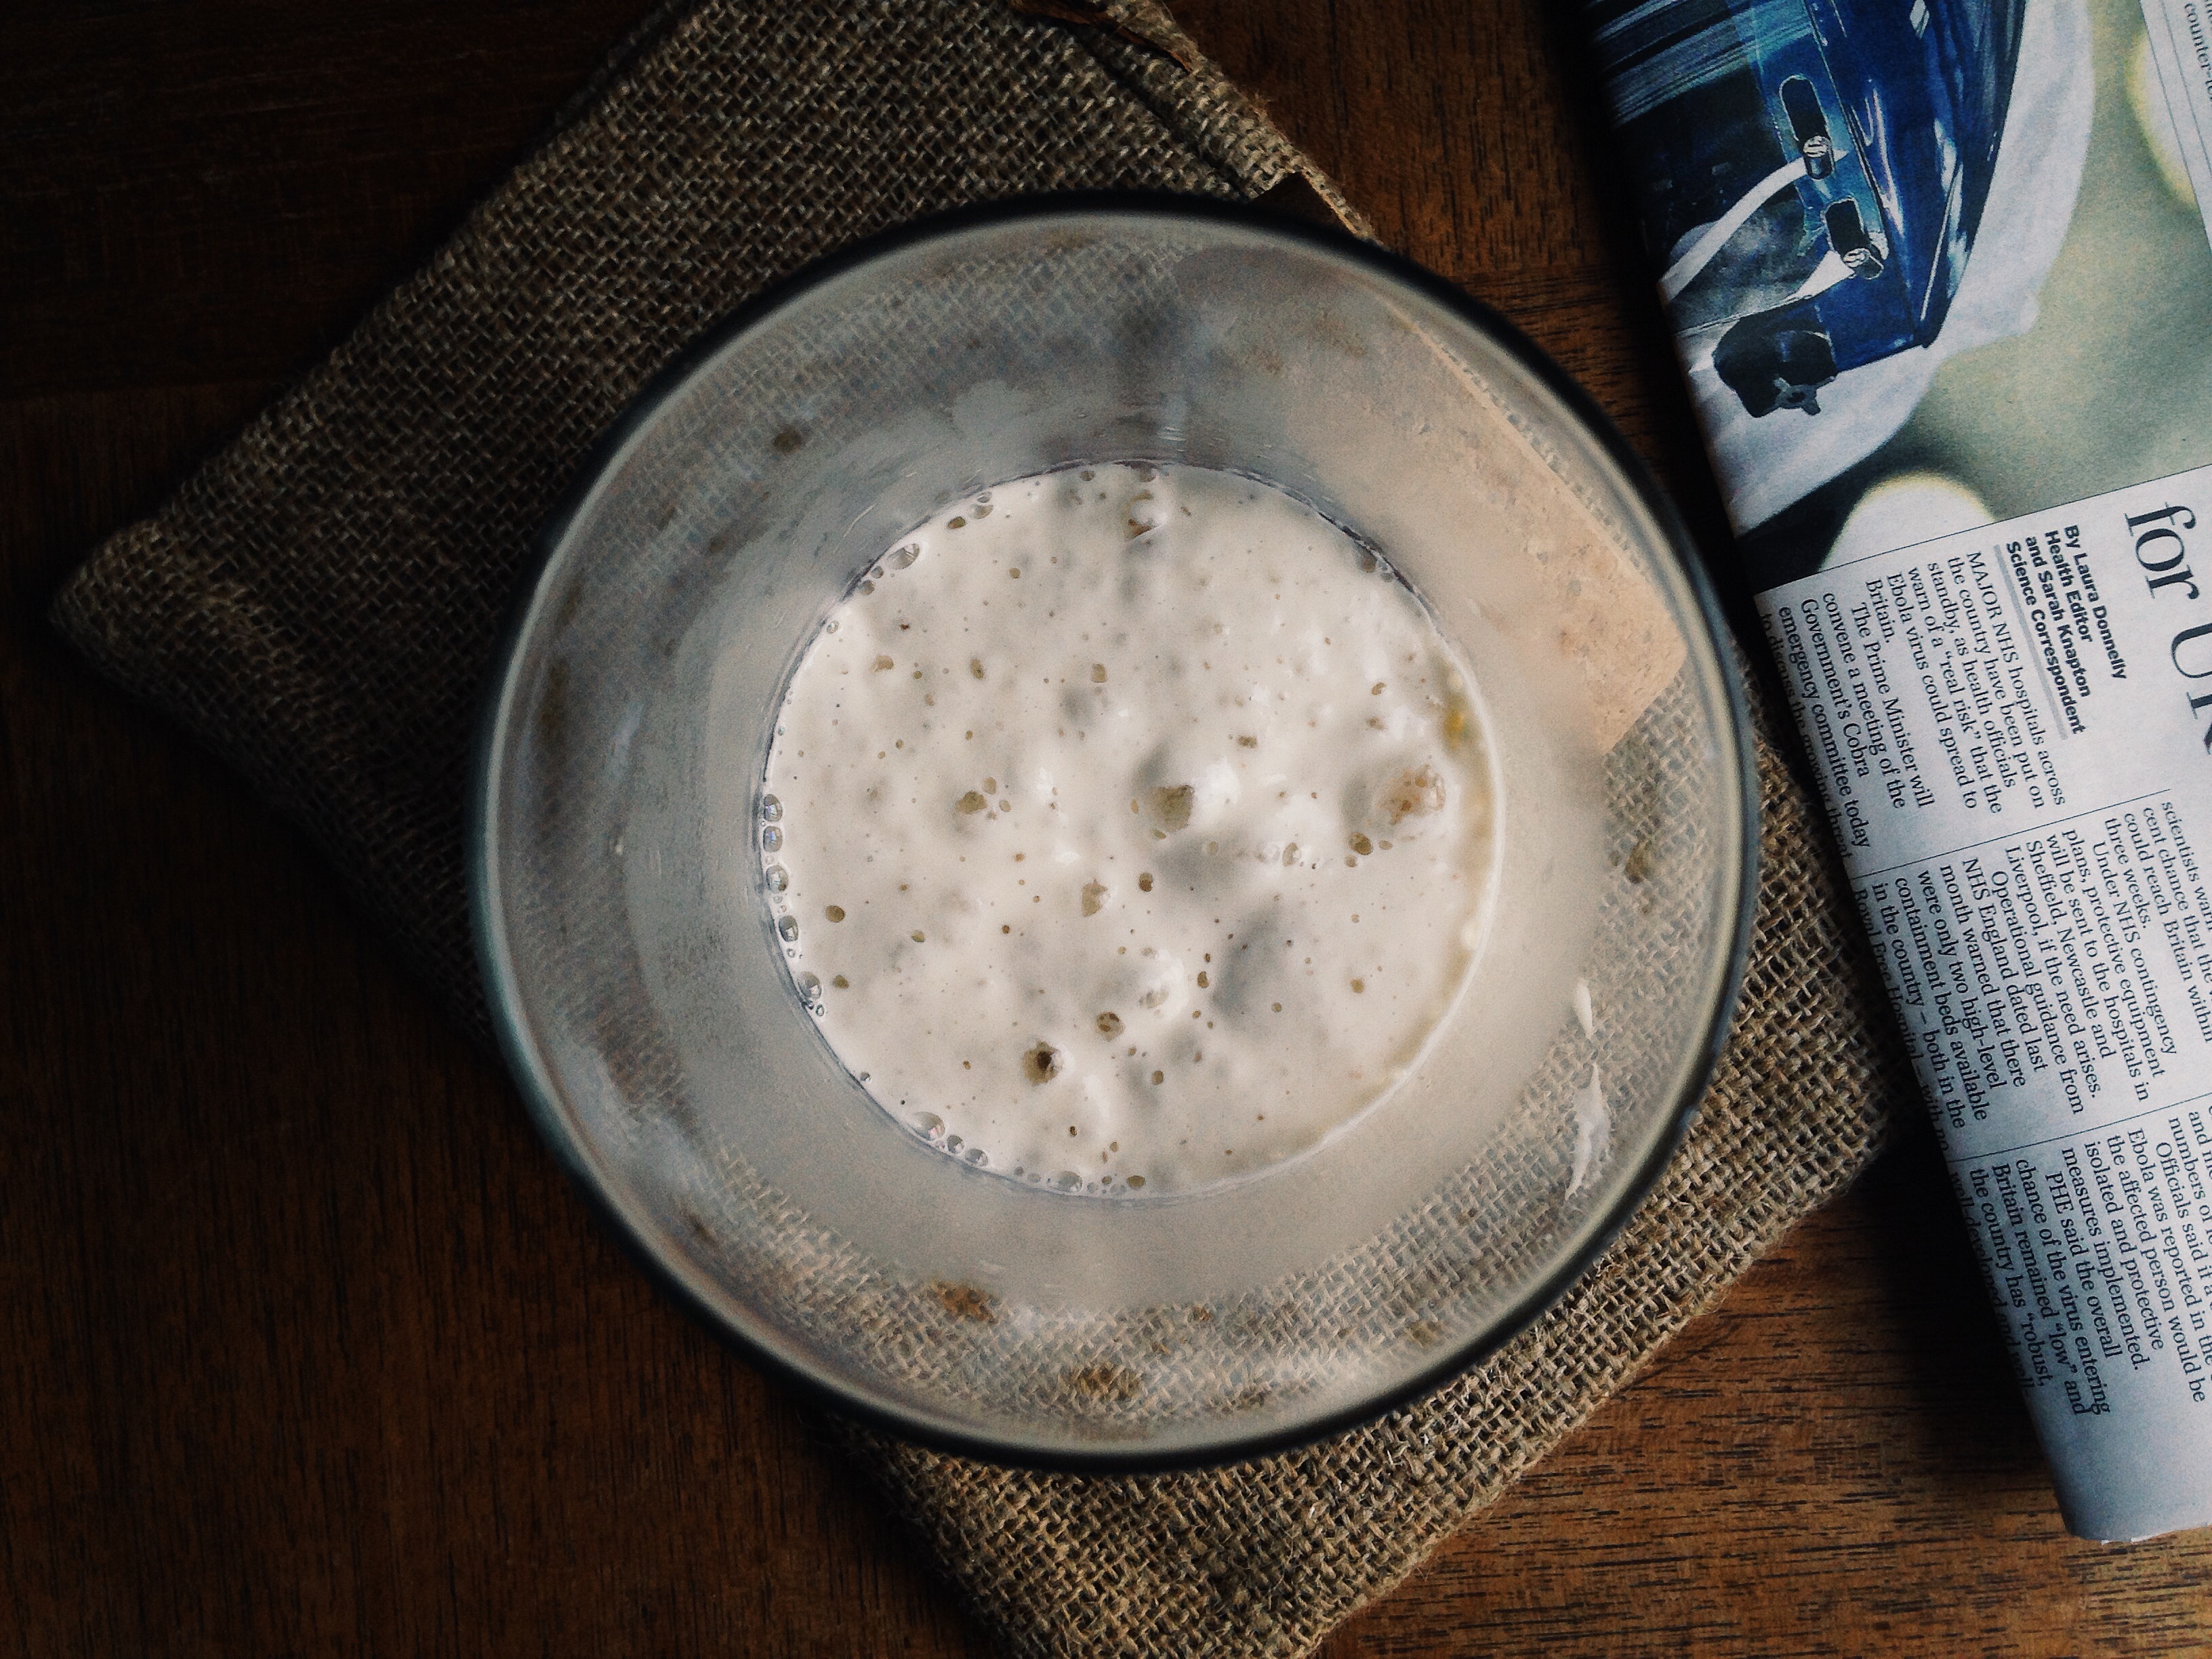
The starter. Source: DWD.
First, you will need what’s called a starter. This is a small quantity of flour and water that you leave to rest for a short period of time. With the help of natural bacteria (on your hands, in the air, in the flour), a yeast culture will form and it is this that you will use to make your bread rise.
You will use this starter every time you want to bake bread, so look after it: name it, nurture it, and make sure it’s always looking healthy.
The starter:
It’s important to be as accurate as possible when measuring flour and water quantities, and if you can, try to carry out each step at a similar time each day. Working the process of feeding your starter into your daily routine will make sure it is always strong and active.
In your container, mix together 25g of bread flour with 25g of water, using a fork to beat out any dry clumps of flour until you have a thick, smooth batter. Cover, and place in a warm spot (22-26c) to rest for 24hrs.
Day 2:
Scatter a little (5g) of bread flour over the batter and leave to rest for another 24hrs.
Day 3:
Add 50g of bread flour and 50g water to your starter, again mixing with a fork until smooth. Cover, and place in a warm area and leave to rest for another 24hrs.
Day 4:
By now your starter may be showing signs of life! Very small air pockets within the batter, visible from the side of your container, or a slightly acidic smell are both good signs that your starter is building up strength.
If your starter doesn’t exhibit any of these symptoms yet, simply scatter a little (5g) flour on the surface and leave to rest for another 24hrs.
If your starter is looking active, it is time to ‘feed’ it.
Pour away 100g of your starter, and to the remaining 100g in the container, add 50g bread flour and 50g water, beating together as you have done on previous steps. Cover, and leave in a warm place for 24hrs.
Day 5:
By now your mixture should be active. Discard 100g of your starter and add 50g of bread flour and 50g water. Mix together and cover, leaving it in a warm place for 24hrs.
Repeat step 5 for another two days, and by day 7 your starter should be strong enough to bake with.
After each feed you should be able to notice a regular ‘rise and fall’ in the starter. After you have fed it, the starter should appear relatively inactive, as it did at the beginning. It should smell milky and slightly sweet.
The starter immediately after feeding. Source: DWD.
Two or so hours after the feed you should see an increase in volume, with air pockets in the batter visible from the side of your container and on top of the starter. It should still smell sweet, but with an acidic smell starting to build.
The starter two hours after feeding. Source: DWD.
Roughly four hours after your feed the starter should be obviously active, often nearly doubling in size. At this stage the starter is referred to as ‘young’ and it should still exhibit a slightly milky aroma. The further into the 24-hour rest the starter goes, the more ‘mature’ it will become.
The starter four hours after feeding. Source: DWD.
Once your starter rises and falls regularly after feeding, you are ready to bake bread!
Please note:
It is important to always replace the starter that you throw away with equal quantities of flour and water.
If you struggle to find a warm spot in your house, simply increase the temperature of the water you use when you feed the starter. Anything up to around 35c is fine (a little warm to the touch) but try not to go any higher than this as it will inhibit the fermentation process.
If you have any questions, or would like a FREE tub of the sourdough starter I use, please comment below or email me at: hugohharrison@gmail.com and I will reply within 24 hours.